
Considering Ableton for DJing
Home 2023 › Forums › DJing Software › Considering Ableton for DJing
- This topic has 59 replies, 1 voice, and was last updated 14 years, 7 months ago by
Emma Partnow.
-
AuthorPosts
-
July 22, 2011 at 12:26 pm #4382
Emma Partnow
MemberSorry my Friends; it took me a couple of Hours to do all that so I Missed your Posts;
But if anything I have Said is Helpful; then I am Very Grateful 🙂July 22, 2011 at 12:41 pm #4384Haroon
ParticipantEmma Partnow, post: 4375 wrote: Sorry my Friends; it took me a couple of Hours to do all that so I Missed your Posts;
But if anything I have Said is Helpful; then I am Very Grateful 🙂I think Phil should consider using your material for articles on using Ableton for DJing 🙂
July 22, 2011 at 1:04 pm #4388MemberHaroon K, post: 4377 wrote: I think Phil should consider using your material for articles on using Ableton for DJing 🙂
Thank You So Much my Friend 🙂
It took me a While to Learn; but I am Happy to Share My Knowledge as I don’t see Anyone as a Competitor; only as a Compardrae 🙂July 27, 2011 at 8:52 am #4719U31
MemberWell, its taking a while to warp or Beatgrid my tracks, one of the main reasons i didnt get on with Traktor over VDJ, with VDJ i can waveride / headphone cue a track and nudge it in beat in miliseconds, so why bother beat gridding?
But with Ableton i can actually see a means to an end to warping properly. Its very early days yet but i love it so far.
July 27, 2011 at 6:46 pm #4763MemberU31, post: 4712 wrote: Well, its taking a while to warp or Beatgrid my tracks, one of the main reasons i didnt get on with Traktor over VDJ, with VDJ i can waveride / headphone cue a track and nudge it in beat in miliseconds, so why bother beat gridding?
But with Ableton i can actually see a means to an end to warping properly. Its very early days yet but i love it so far.
I am Here Every Day my Friend; and am Willing to Help You with Screenshots again Whenever and as Often as you Need :); if you have 1000,s of Tracks as I do; until I Know I am going to be Using them in a Set;
I just place a Warp Marker on the First Beat of Each Track;
Right Click and Set this Warp Marker as 1.1;
Delete the First Warp Marker that Ableton Sets (usually right at the Start of the Track – even if there is No Sound);
Right Click the Warp Marker we have Placed and ‘Select’ Warp Straight From Here;
Press Save in the ‘Sample Box’ (as this is now Our Correct BPM);
And then go on to another Track;When I want to pull out say 30 Tracks for a 2 Hour Set; it is then that I will go into the Track in More Detail; adding Additional Warp Markers if Necessary 🙂
July 28, 2011 at 4:16 am #4822pilotmike327
Member@Emma: You rock. Just wanted to let you know 🙂 Great job with the detailed explanations
July 30, 2011 at 7:15 pm #4918Memberpilotmike327, post: 4816 wrote: @Emma: You rock. Just wanted to let you know 🙂 Great job with the detailed explanations
Thank You Mike; You Are A Very Kind Man 🙂
July 31, 2011 at 1:47 pm #4953Chris Jennings
ParticipantFor the life of me I can’t wrap my head around Ableton. I have some songs I want to do edits of and the last time I sat down to warp one of them I felt like I made some progress, but it surely didn’t came as natural to me as Traktor and regular DJ’ing.
July 31, 2011 at 2:10 pm #4955MemberI dont think it would come naturally to anyone who had experienced “Conventional” DJing to be honest. The first step is to download the trial from Ableton and do the lessons that come with it, and then look at Emma’s posts and try to apply what she says to what you have leant in the lessons.
July 31, 2011 at 8:10 pm #4963MemberChris Jennings, post: 4947 wrote: For the life of me I can’t wrap my head around Ableton. I have some songs I want to do edits of and the last time I sat down to warp one of them I felt like I made some progress, but it surely didn’t came as natural to me as Traktor and regular DJ’ing.
Hello Chris 🙂
As I Promised once before in this Thread; I will now proceed to Show You (and Other Members Involved in this Thread who are Interested); ‘How’ to Cut Loops from Tracks and Save them for Later Use; and ‘How’ to Edit Tracks (which is your Specific Question today);
This will take at least 1-2 Hours with Screenshots so I hope you will find some Benefit from it 🙂If Phil Allowed me (Us) to put a Music Player on this Forum it would be Much Easier as you would be able to Hear the Sound Of The Loop; rather than just see the Waveform; however; with a Loop (as I am Sure you are Aware); the Loop has to be ‘Exact’ so that it ‘Rolls/Loops’ Without any Clipping (Other Sounds Outside Of The Loop) at Either End;
First of all we Open Ableton with a Blank Project;
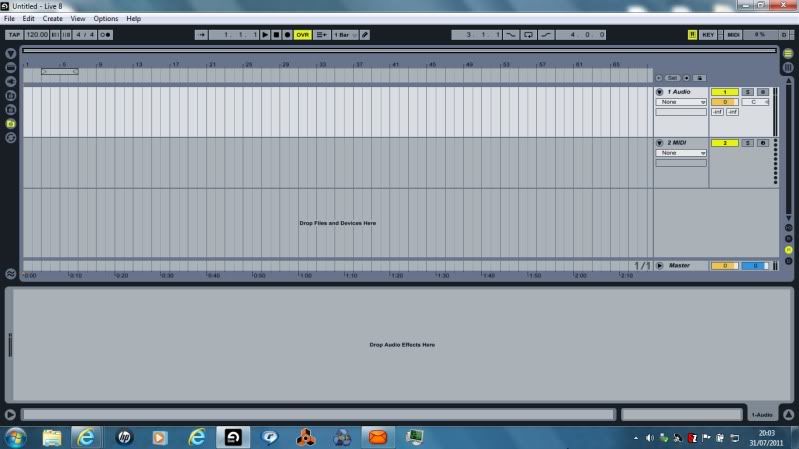
We then ‘Right Click’ on the Audio Channel (Above the MIDI Channel); and Select ‘Insert Audio Track’
This will give us an ‘Extra’ Audio Channel to Work With;
On the New Channel we have Added; Click on the Black ‘Right Facing’ (Surrounded in Grey) Arrow to Open the Track
And then we ‘Right Click’ on the MIDI Channel and Select ‘Delete’
This will then give us the Following Image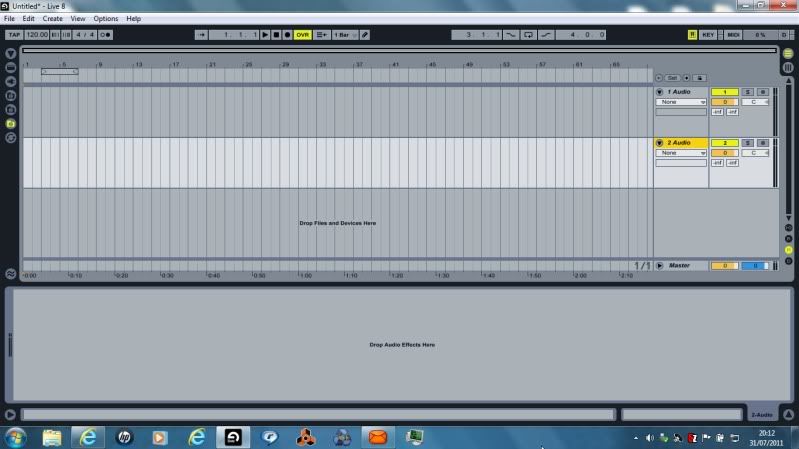
We now need to Select a Track we would like to Work With; so; if you ‘Open Your Browser’ (which in My Picture is the Icon Highlighted in Yellow); and once you have done this; the ‘Best’ Option to Choose on the ‘White Bar’ Immediately Adjacent to the ‘Black Arrow with a Grey Background’; is ‘Workspace’; as this will Include ‘All’ of the Drives On Your PC; … you can Select This by Clicking the ‘Down Arrow’ Immediately to the Right of Whatever Word is Currently Shown (Library – Desktop – My Documents etc);
We now need to Scroll to a Track we would like to Cut a Loop from;
Before we do this I will show you the Open Browser: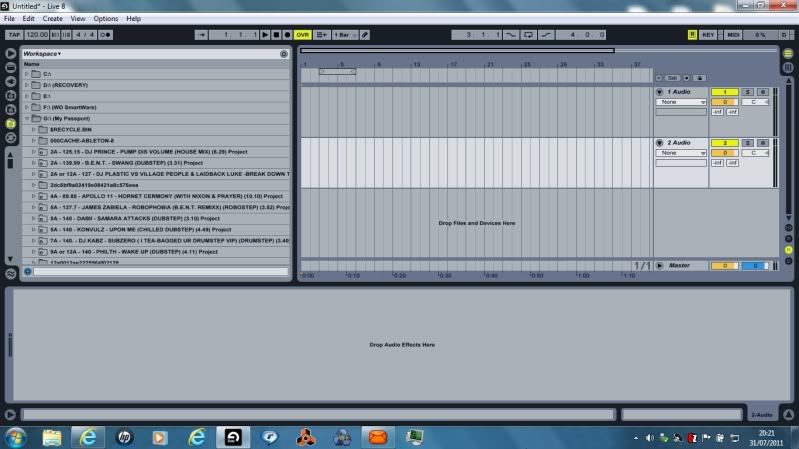
When we have Scrolled Down in Our Browser to Find the Track we would like to Work With;
We ‘Left Click’ the Track and Allow Ableton to ‘Scan’ the Track (if it has Not already done so); and this ‘Scanning’ will be Seen in the Above Window in the ‘White Space’ Underneath your List Of Information in your Browser – to the ‘Right’ of the Blue Headphone Icon;
Once Ableton has ‘Scanned’ the Track (Literally Seconds to do this); we ‘Hold Left Click’ and ‘Drag’ the Track into the Channel Named ‘1 Audio’;
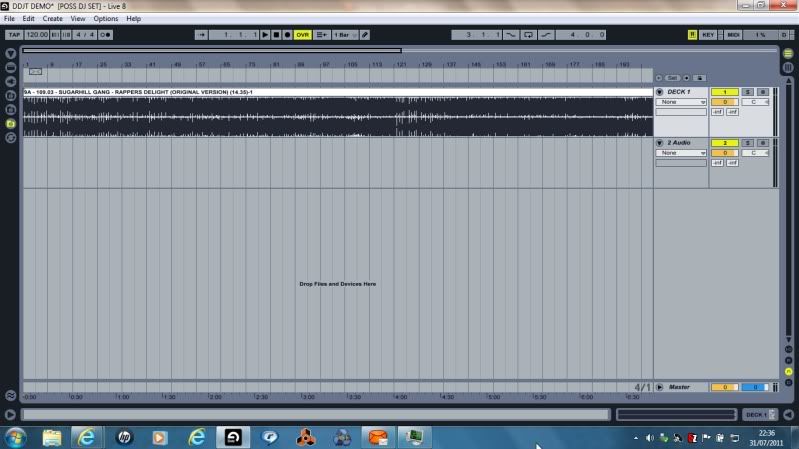
Your Screen will now look like this:
We will now ‘Close Our Browser’ But; it is ‘Paramount’ we ‘Keep’ the Browser in the Same Position it is ‘Now’ and ‘Not’ Scroll Back Up To The Top; (the Reason for this will become Clear later);
We ‘Close Our Browser’ just by Clicking the ‘Black Arrow’ at the ‘Top’ of Our Icons in Our Browser;
Once we have done this we have more Room to Work on Our Track;
The Next Step is to ‘Double Click’ the ‘Title Bar’ of The Track; and we then get the Following Image: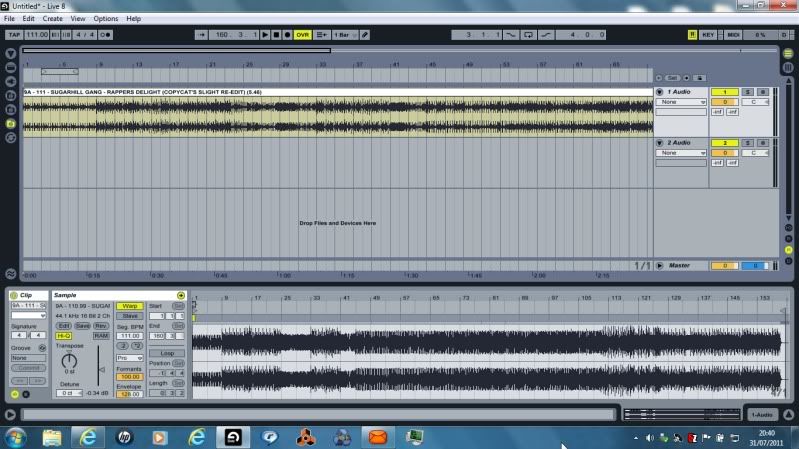
These Steps may seem like Real Beginner ones; but somebody here may Need this Information;
And my Next Post will contain the Information that You (Chris); and another Member asked for 🙂July 31, 2011 at 9:18 pm #4964MemberSweet Emma! I think Phil needs to get you to write about Ableton for the main Blog pages
Thanks for taking the time out to explain… And trust me.. id rather the “baby steps” and learn properly the first timeJuly 31, 2011 at 10:43 pm #4971MemberOkay then; Next Steps 🙂
The Track I have Chosen is ‘Sugarhill Gang – Rappers Delight’; it is the 14 Minute Version; and the Reason I have Chosen it for this Exercise is for Two Reasons:
1: We will be taking a Loop from it;
2: We will be making a DJ Edit;(And I Chose the Wrong Version in the Screenshot Above – we All make Mistakes 🙂 – however; we will be Continuing Our Screenshots with the Correct Version of the Track :))
The First thing we Must Do is Enter a Warp Marker at the Beginning of the Track (In The Sample Area)
Where the First ‘Sound Begins’ (by ‘Double Clicking’ in the Exact Position we would like the Warp Marker to Appear – Which in ‘Some Cases’ is Not Necessarily on the First Beat –
We Only Enter Warp Markers On The First Beat ‘When There Is One At The Beginning Of The Track’; (Or If We Choose To Enter It There); because if the First Beat is 30 Seconds into the Track Ableton will ‘Cut Off’ the First 30 Seconds ‘IF’ we Set Our First Warp Marker To Be ‘1.1’; as we are Telling Ableton to Begin The Track At ‘That’ Point;
And We Must ‘Always’ have a Warp Marker Set At ‘1.1’ otherwise Ableton Will Not Know ‘Where’ to Begin The Track;So; in the Screenshot Below we have Identified ‘By Zooming In’ with Our Magnifying Glass; the ‘First Event’ that Occurs in This Particular Track (as the Wave Pattern changes From a ‘Broken Line’ into a ‘Continuous Line’; and in this Track the ‘First Event’ is a Bassline Note and ‘The Most Important Pattern’ in the Whole Track; so to set Our First Warp Marker on the First Beat in This Case would be a ‘Big Mistake’;
I would like you to Please Notice that in the ‘Sample Box’ to the ‘Left’ of the Waveform; I have ‘Selected Complex Pro’ from the ‘Warp Mode’ Drop Down Arrow – which is Directly Underneath the BPM – the Reason I have done this is because I have realised Most Recently that we are getting the ‘Best Quality of Sound’ from ‘Full Tracks’; so if you could Please do this also;

You will Notice in the Above Screenshot that there is a Warp Marker that Ableton has Automatically Entered as the ‘Start Point’ for this Track; we ‘Know’ this is Not In Fact Correct; so we Need to ‘Right Click’ on this Warp Marker and Select ‘Delete’; once we have Done This we ‘Right Click’ on the Warp Marker We Have Entered On the Waveform and Select (from the Drop Down List that Appears) ‘Set 1.1 Here’; and then Once More ‘Right Click’ on this ‘Same Warp Marker’ and Select from the Drop Down Box ‘Warp From Here (Straight)’
You will then Notice that the Waveform ‘Suddenly’ Jumps to the Left; and Our Warp Marker that we ‘Placed’ has now Become the Beginning Of Our Track;
And; (although I have Messed With This Track ‘Many Times’); even though Mixed In Key Informs me that this Tracks BPM is 111BPM; Ableton tells me it is 120BPM (it doesn’t Matter what it tell you as I have Worked on this Track Many Times); and so we ‘Save’ this Information just by Pressing ‘Save’ in the Sample Box’
We then go to Our Mater Tempo at the Top Left of Our Screen (Underneath the ‘Edit’ Button’) and ‘Change’ Our Master Tempo to Whatever Ableton has told us the BPM of the Track is From Our First Warp Marker Entry;That is now the ‘End’ of the ‘Usefulness’ Of the Sample Box and (Bottom) Waveform; as we will now be Working with the Waveform in Our Audio Channels; (and the Fact that we Need NOT Enter Any Further Warp Markers Into This Track); as I ‘Know’ this Track does Not ‘Drift’ Even Over 14 Minutes; so we can Close the Bottom Waveform Area by ‘Left Clicking’ Once on the ‘Black Up Arrow’ at the Bottom Right Of Our Screen; so Our Screen looks like this;
Now; in order to Answer Your 2 Questions; I Need to Show You ‘How’ to Loop; and ‘How’ to Edit;
First of all we will look at ‘Looping’;
Now; in ‘This Track’; a Bass Sample from ‘Queen – Another One Bites The Dust’ is Used;
I Love this Sample; and we Need to find a Place in this Track where ‘All’ we Hear is that Bassline;This ‘Sample’ (with Hand Claps) appears at Bar 121; and lasts for 4 Bars (up to Bar 125);
In Order to ‘Cut This Sample Exactly’ we Must Be Certain that we Do Not Cut Anything Other Than What We Need;
And Of Course what will ‘Help Us Massively in this Process’ is the ‘Loop Switch’; which in This Case is ‘Above’ Bar 127; we Need to Press this Once so it Turns Yellow; and you will also Notice that I have Brought Our ‘Loop Brace’ that Usually sits at the Beginning of the Track; and Placed it Between Bars 121 and 125;
At the Beginning of Bar 121 (included with the Bassline is a Hi-Hat; and ‘Before’ Bar 125 ‘Begins’ there is Also a Hi-Hat; Now We ‘Only Need One Hi-Hat’ Or the loop will Sound ‘Odd’;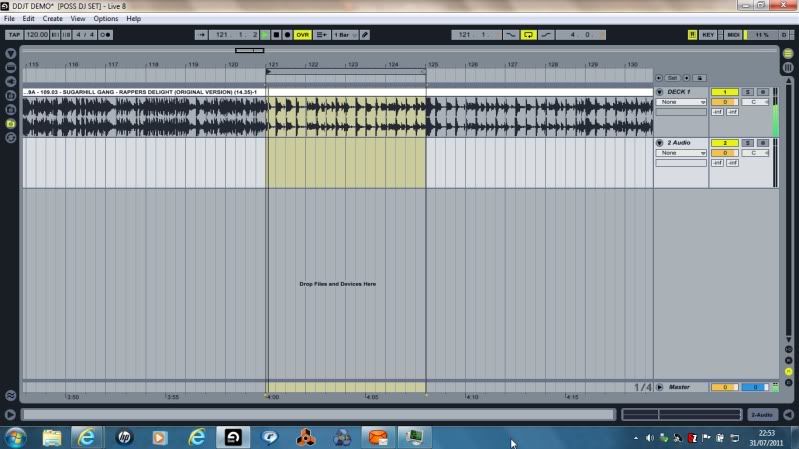
In the Screenshot Below I Show you the Beginning of Bar 121 (and How Precise We Must Be);
Once we have found the ‘Beginning’ of the Loop (and the Loop is Running ‘Perfectly’); we ‘Right Click’ at the Precise ‘Grid Line’ of the Beginning Of The Loop and Select ‘Split’; this will ‘Seperate – or ‘Enclose’ That Part Of The Loop
from the Rest Of The Track; as seen Below: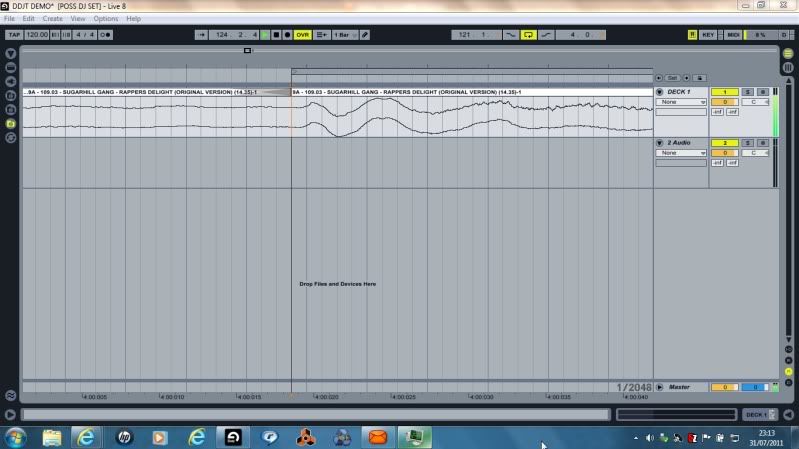
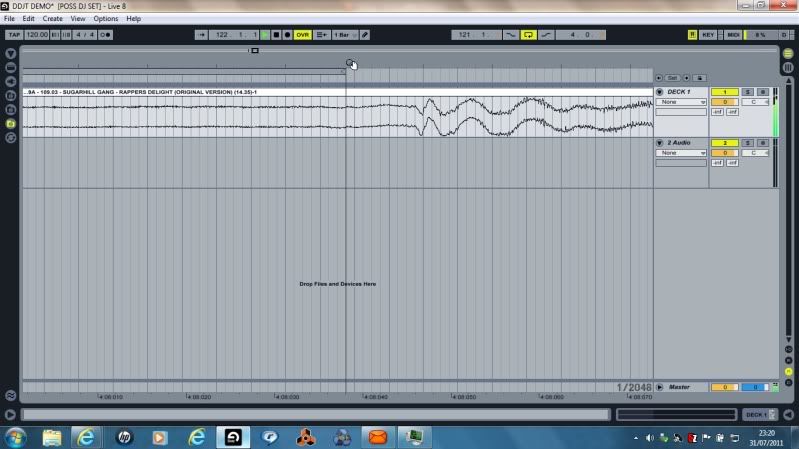
We do the Same at the End Of The Loop (‘Right Click’ and Select ‘Split); this time being Extremely Precise that we ‘Don’t Include’ the Hi-Hat that we ‘Already Have’ at the Beginning of the Loop; as shown Below;
Now comes ‘One’ Of The Most Excellent Things About Ableton (if you are a Sampler Like Me :);)
If you now ‘Zoom Out’; and ‘Left Click’ Inside the Loop you have ‘Created’; it will Turn ‘Yellow’;
Now is the Part where we Need to ‘Open Our Browser’ Once Again;
If Our Browser is in the ‘Same Position’ as it was (Meaning – if you Dragged the track from your MP3 Folder; that your MP3 Folder is Still Visible); we will see Some Magic Happen 🙂‘Left Click’ and ‘Drag’ your Highlighted Loop to Your Browser; and you will see that Ableton ‘Creates A New Folder’ for you; and this Folder will Contain ‘Any Samples/Loops’ you have Created from This Track; and Keep Them There (Unless You Wish To Move Them Elsewhere) so that The Samples ‘Associated’ With this Track Are Easily Accessible;
You Will have the ‘Ability’ to ‘Rename’ this Sample (such as ‘Queen Bassline Loop – or Anything You Please);
And Your Screen Will Look Like this: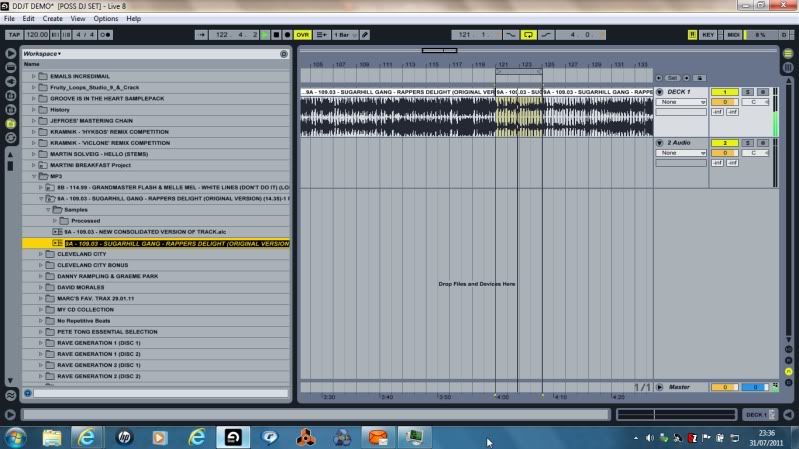
Rename the Loop; Press Enter; Ableton will do its Processing; then you have ‘Begun’ your ‘Sample Library’ and the Sky is Literally The Limit 😎 😎
This has taken 4 Hours so far; but I will still Answer the Final Question before I stop;
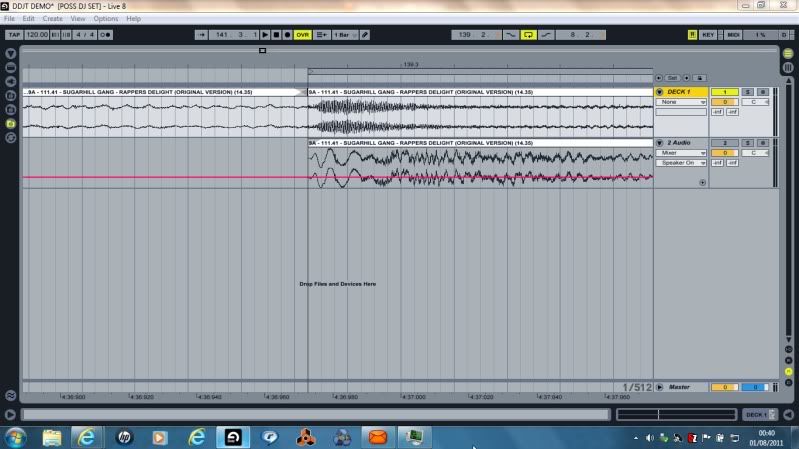
August 1, 2011 at 12:06 am #1001252MemberThe Final Question (and I am Happy to Answer As Many Questions As Are Asked) in Tonight’s Process; is Regarding the ‘DJ Edit/Cut’;and This ‘Rappers Delight’ Track is ‘Perfect’ for this; as there is a Section Within This Track that I Dislike;
So; Our Process will be to ‘Remove’ this Part Of the Track;And this is where ‘Sometimes’ it gets a ‘Little More Difficult’; as the Section Of The Track I Dislike (which is Basically just a Breakdown); Appears Between Bars 139.2.4.25 and 148.1.4.8; but; however ‘Insane’ that ‘May’ sound; with Our Loop Brace and ‘Our Trusted Ears’; it is Not A Problem At All :);
We Begin Once More; Exactly as we did in Our Approach to a Loop;
And we find ourselves with Our Loop Brace between Bars 139.2.4.25 and 148.1.4.8 (instead of Bars 121-125);
The ‘Most Important’ Part Of This ‘Edit/Cut’ being that I ‘Begin It On A Beat’;
We Zoom In; and Find Ouselves Here:
And Once More; we ‘Right Click’ on Our Grid and Select ‘Split’ where we Wish to Split The Track: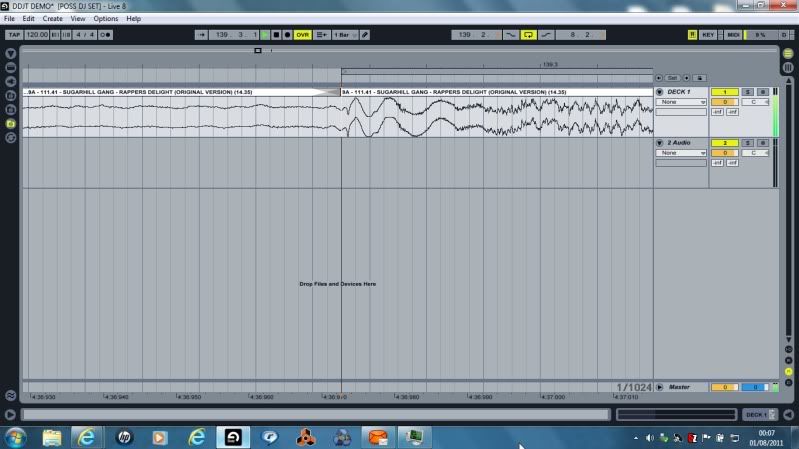
When we Move To The End Of The Loop; it is ‘Important’ that the ‘Loop Ends Immediately Before An Event’; such as in This Case; the ‘Return Of The Vocal’;
Our Track (again Once we have ‘Right Clicked’ and Selected ‘Split’; will Look Like This);
Again; ‘Precision Is The Key’;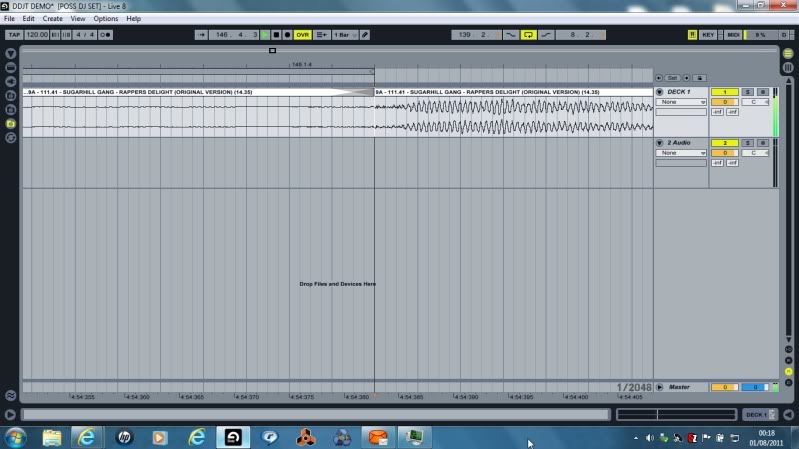
Now we come to the ‘Reason’ We Inserted a ‘Second Audio Track’ 🙂
In Case we have ‘Possibly’ made a Mistake; it is Very Easy’ to just Go Back One Step; but what we ‘Need’ the Second Audio Track for; is to ‘Have Somewhere To Remove This Breakdown Without Deleting It’ – Until We Are Ready;
Once Again; as in Our Loop Tutorial (having Split This Loop and Zoomed Out); we ‘Left Click’ on the Loop (in Essence ‘Selecting’ it; so it ‘Turns Yellow’;
But in This Case we are going to ‘Drag’ the Split Loop ‘Down Into the Channel Named ‘2 Audio’;
When we have done this; Our Screen will look like this: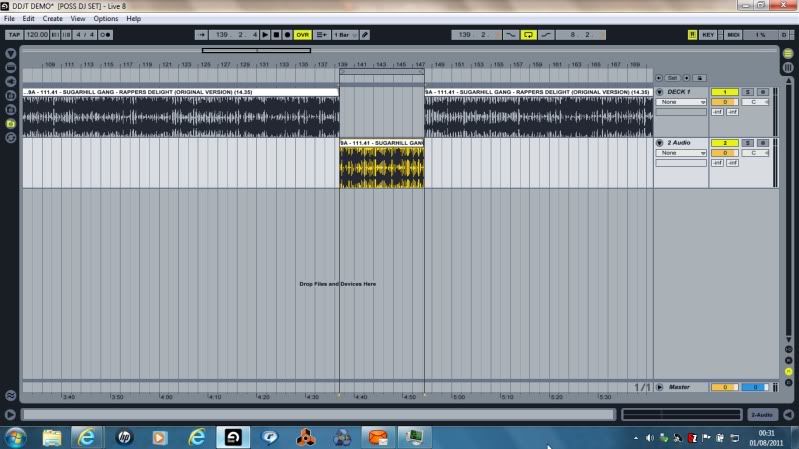
Now; the Next ‘Important’ Job is to ‘Join/Stitch’ Our Track Together;
But; having made Our ‘First Split’ on a ‘Beat’; we have a Good Chance that the Track will ‘Fit Together’ 🙂When I ‘Join’ Tracks (That Have Been ‘Split’); I Always Zoom Out to this kind of Resolution so there is ‘No Overlapping’; which will ‘Hinder’ Our Ability to Join Tracks Correctly;
However; as my First ‘Split’ was On A Beat; but my Second ‘Split’ was Not On A Beat; there was ‘No Way’ this Track was Going to Join Together ‘Without It Sounding Like A ‘Jump’ On A Vinyl Track’
(Just Typical In A Tutorial :D);But; ‘Fortunately For Us’; we have ‘Already Cut Out A Perfect Instrumental Loop’; which will Fit ‘Between’ these Two Splits ‘Like An Absolute Dream :);
So; we can now ‘Delete’ Our Breakdown that we have ‘Removed’; and ‘Drag Our Queen Bassline Loop From Our Browser To Make The ‘Bridge’ Between Our Two Splits’;
The First Thing we ‘Need’ to do is Undo Our Actions Of ‘Joining’ Our Tracks – in my Case Pressing Undo (in the ‘Edit Menu’) 3 Times;
Then; Open Our Browser (which we will find in the ‘Same’ Place as it was when we Dragged and Renamed Our Queen Bassline Sample into it); Or; if you haven’t been Following This Tutorial you ‘May’ have a Sample from the Track you are ‘Cutting’ or Working on a ‘DJ Edit’ – Or; you ‘May’ (the Best Idea) have Cut the Track with ‘Both’ Splits Beginning and Ending on a ‘Beat’;
We Drag Our ‘Sample’ into the Channel Named ‘2 Audio’; as shown in the Screenshot Below: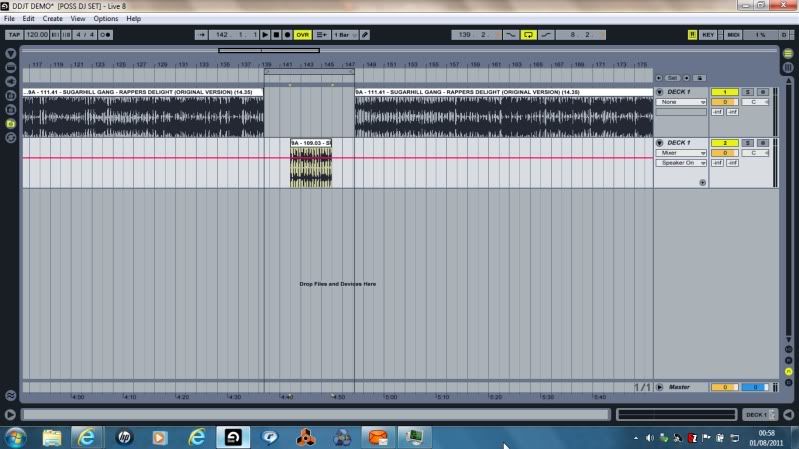
And we Notice that ‘Our Sample’ is Not the Correct ‘Length’ to Fill The Gap Between The 2 Split Tracks;
However; This Is No Problem Whatsoever; as we just ‘Left Click’ the Sample (so again it is Highlighted Yellow); and Drag it into the Middle of the Two Split Tracks;
We then Need to ‘Attach’ the Beginning of the Sample to the ‘End’ of the First Split Track;
We do this again ‘Zooming Out To High Resolution’ and ‘Join’ it to the First Split Track; like so:August 1, 2011 at 12:37 am #4976Member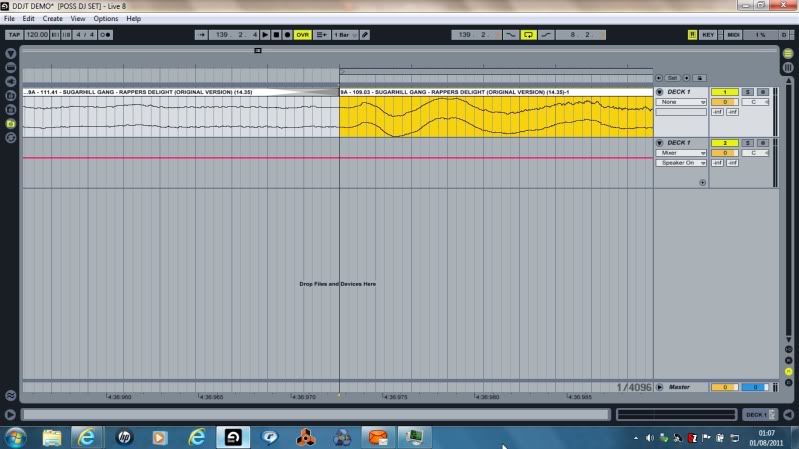
We then ‘Join’ Our Second Split Track to the ‘End’ Of This ‘Sample’;
And as the ‘First Split Track Ended ‘Expecting’ a Beat To Follow’; the First Part Of Our Queen Bass Loop ‘Beginning’ with a ‘Bass Note’ is Satisfactory to ‘Fill This Expectation Of A Beat’;And the ‘Challenge’ we Experienced when we First Attempted to ‘Join’ these Two Split Tracks; will now ‘No Longer Be An Issue’; as the Final Bass Note of the ‘Queen Sample’ will ‘Lead Perfectly Into the Vocal’;
Once We have ‘Joined’ Our Second Part Of The Split Track to the Queen Sample; Our Screen will look like this: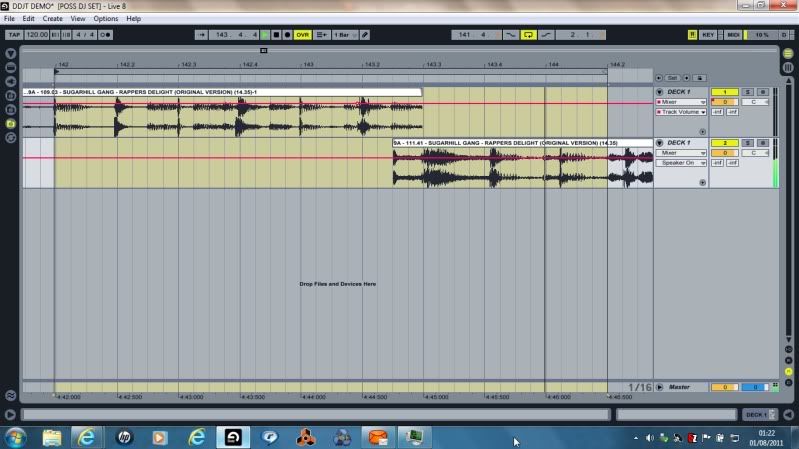
And before I say Anything Else; I Must Reiterate that I am as ‘Honest As The Day Is Long’;
So; I have Posted the above Screenshot and ‘Shown’ that in Fact to ‘Make The Second Part Of Our Split Track ‘Fit’ Our Screen Sample’; I have had to ‘Move The Second Part Of Our Split Track One Eighth Of A Bar ‘Over’ the Ending Of The Queen Sample To ‘Make It Fit Absolutely Perfectly’ (As If The Track Was Originally Made That Way); but I just see that as ‘Working With What You Have’ 🙂Using the Above Process of ‘Cutting/DJ Edits’ I have Cut 14 Minute Tracks Down To 6 Minute Tracks; ‘Whilst Still Keeping The ‘Essence’ Of The Original Track’; and I Hope that after this Enormous Six Hour Tutorial :eek:;
You Will Be Able To Do The Same 🙂Again I would like to say that I am Very Happy to Answer Any Questions Regarding Any Process Within Ableton 😎
Best Regards;
Emma 🙂August 1, 2011 at 6:26 pm #5020Phil Morse
KeymasterChris Jennings, post: 4947 wrote: For the life of me I can’t wrap my head around Ableton. I have some songs I want to do edits of and the last time I sat down to warp one of them I felt like I made some progress, but it surely didn’t came as natural to me as Traktor and regular DJ’ing.
Agreed Chris, warping takes a LOT of getting used to but it’s obviously much more powerful than Traktor’s fallable/simplistic “one size fits all” beatgrid.
-
AuthorPosts
- The forum ‘DJing Software’ is closed to new topics and replies.