
Considering Ableton for DJing
Home 2023 › Forums › DJing Software › Considering Ableton for DJing
- This topic has 59 replies, 1 voice, and was last updated 14 years, 7 months ago by
Emma Partnow.
-
AuthorPosts
-
July 19, 2011 at 1:53 pm #1001102
U31
MemberYeah i’m finding that… for doing a recording it doubtlessly would be flawless, but for on the fly DJing it seems a big faff about rather then a few seconds beat matching etc..
Not really impressedJuly 19, 2011 at 2:00 pm #4135Haroon
ParticipantEmma Partnow, post: 4058 wrote: Hello Ivyquake 🙂
Unbelievably I watched the Video you just put up at 5am this morning 😀
The Challenge I have with Traktor and Ableton though; is that Ableton will Only Run off my Internal Soundcard; and Traktor will Only Run off an ASIO; so I am Unable to Link them (which is what I Wanted To Do);
And there is No Possibility of me Affording an External Soundcard 🙁Although Mike may be able to; and it is his Thread after all 🙂
Hi Emma,
You dont need to buy an external soundcard for ASIO, there is a universal ASIO driver http://www.asio4all.com/ I’ve used it in the past on my old viao laptop its well known and reliable.
July 19, 2011 at 2:02 pm #4136Emma Partnow
Memberpilotmike327, post: 4111 wrote: Alrighty! Let’s try this baby out. I don’t know if I should do a full install on this computer and use up a license code or run a demo and wait to get my new comp and install it at that time. I remember reading that you can only register 2 computers so i’m not sure if installing the full version on this one is a wise choice (as i installed a full version on my last mac).
Hello Mike 🙂
I don’t know what Restrictions (if any there are on the Trial Version – as in Reason 5 for instance they don’t allow you to Record Anything on Trial which is a bit Pointless); but if you are Definitely getting a New Mac Soon; I think it is Important you don’t Waste Your Last Licence;
I will Help You with Anything you Need to Learn to DJ with Ableton; and you will Honestly (having Experience as a DJ but also Experience as a Producer within the Ableton Environment) Never Look Back 🙂U31, post: 4117 wrote: Ok ok, i’m sold on the idea too now.. Gonna D/l the trial and give it a whirl..
If I can Learn ‘How’ and Make It Successful; you can Too my Friend :);
It is Hard to Find Tutorials on DJ’ing in Ableton; but I know where they are and will Point You Towards Them 🙂Paul McGuinness, post: 4122 wrote: Ive done loads of mixes for radio shows over the years in Ableton although it took me a while get used to the new warping feature in Ableton 8 but its ok now. The only thing I haven’t yet used fully in Live is doing mixing on the fly for me its no much messing round, by the time ive warped and marker-ed the mp3 or wav i could of just mixed in on cdj or vinyl deck ha ha.
This is True to Some Extent Paul of course; but once I have put a Warp Marker (and I only use One); I Mix in Session View (on the Fly) just by Ear; I don’t set up Cue Points or anything; and of course once you have placed a Warp Marker and pressed ‘Save’ you will never have to touch this Track again; where with CD and Vinyl you are Starting From Scratch Every Time; (and Maybe why Some people only carry a ‘Few’ Tracks – and Know Them Well – as Our Brains can only Memorise ‘So Much’) 🙂
July 19, 2011 at 2:05 pm #4137MemberU31, post: 4127 wrote: Yeah i’m finding that… for doing a recording it doubtlessly would be flawless, but for on the fly DJing it seems a big faff about rather then a few seconds beat matching etc..
Not really impressedFor a ‘Beginner’;
Master Tempo at 128
Two Tracks at 128BPM
One Warp Marker on the First Beat of Each Track
Press Play on Both Decks (or Place Both Tracks in One Scene – One Line); and Press Play on ‘Scene’ Button
Seamless Mixing Through the Whole Tracks
Done 🙂July 19, 2011 at 2:43 pm #1001104MemberCheers Emz, ill have a go…
My mate who is on the proper course says next time he’s over he’ll bring the videos and his vestax.. 😀July 19, 2011 at 3:10 pm #4144MemberU31, post: 4134 wrote: Cheers Emz, ill have a go…
My mate who is on the proper course says next time he’s over he’ll bring the videos and his vestax.. 😀Cool 😎
Obviously it is So Much Better to actually ‘See’ somebody do it 🙂And if you have a Soundcard or ‘Two Outs’ so you can Monitor what ‘You Hear’ and ‘What The Crowd Would Hear’
(You can set up the ‘Cue Track to Headphones’ on the Bottom Right of your On Screen Mixer);
You can then use the ‘Pitch Adjusters’ to Nudge just like with Vinyl or CD; and these are found to the Right of your Master Tempo; so that once you have ‘Sorted’ Two Tracks of the Same BPM; you can then Move On to Mixing Tracks of Any BPM; (though as you know the ‘Recommended’ BPM ‘Maximum’ would be + or – 5BPM);
But I am a Bit Crazy; so I Mix Any BPM into Any BPM; but You and Mike will be able to do this Also at some point 😎July 20, 2011 at 9:53 am #4237ParticipantJust spotted this tutorial posted on facebook yesterday:
http://www.abletonop.com/2011/07/how-to-dj-with-ableton-live-part-1/July 20, 2011 at 11:33 pm #4287MemberHaroon K, post: 4230 wrote: Just spotted this tutorial posted on facebook yesterday:
http://www.abletonop.com/2011/07/how-to-dj-with-ableton-live-part-1/This is an Excellent Tutorial Haroon; I Can’t Wait for Part 2 🙂
July 21, 2011 at 7:57 pm #4320pilotmike327
MemberHaroon K, post: 4230 wrote: Just spotted this tutorial posted on facebook yesterday:
http://www.abletonop.com/2011/07/how-to-dj-with-ableton-live-part-1/This whole website is great! Will be surfing it. I would love to find a video of someone actually mixing with ableton (no tutorial, no talking, just mixing with the screen split between what’s on the screen and what the DJ is doing with their hands.
@Emma: How does cueing work with ableton. I’ve been looking around and haven’t seen this actually done yet. I like to have different cue points within a track and jump around. Would this be possible? I have a feeling it is.
July 21, 2011 at 9:57 pm #4335MemberYes; this is Easy Mike :);
If you have Ableton (and I can’t remember if you have I am Sorry);
Go to Session or Arrangement View (whichever you Feel Comfortable with);
Double Click the Track so you can see the Waveform (enlarge it if Necessary by Pulling on the Bar Above the WaveForm;
Decide which Part of the track you want it to Start At;
Then Pull the Start Marker of the Track (usually Very Close if Not On the First Warp Marker) to the Beat or Break you want the Track To Start On; and then when you Press Play; the Track Will Begin From There 🙂Screen 1:
Start Marker At Beginning Of Track: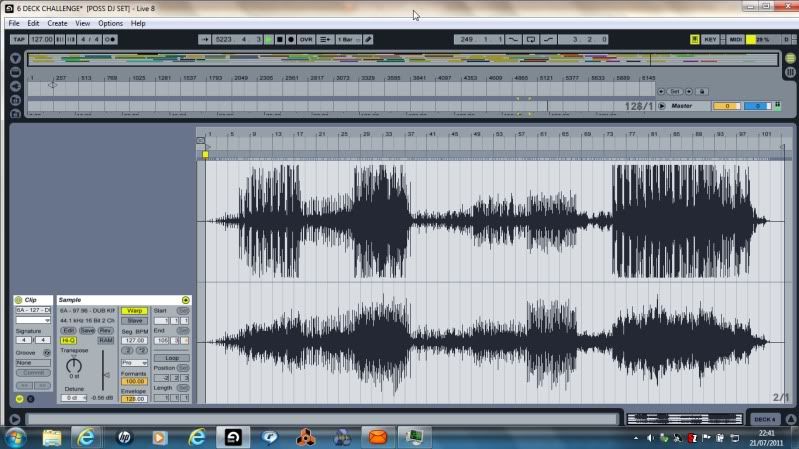
Screen 2:
Start Marker Moved to a New Cue Point: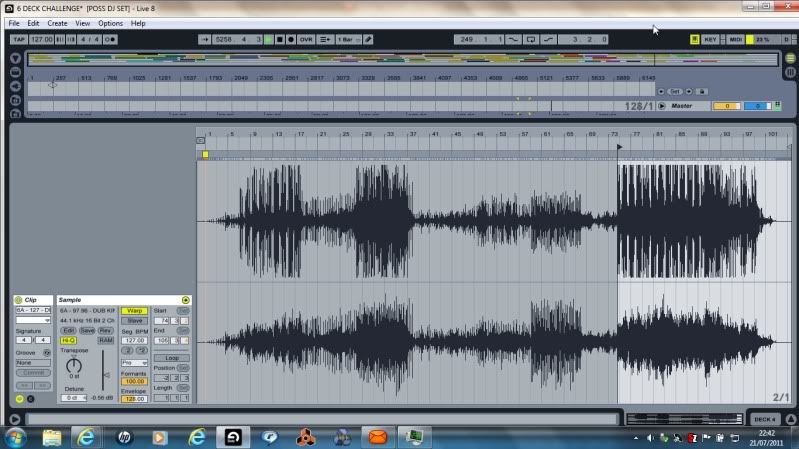 July 22, 2011 at 7:49 am #4364Member
Im starting to get the hang now, a few difficulties in warping very complex tracks, and id like to be able to master loops and triggering them on the fly.. tho i have worked out how to type in the position of the beatmarkers and loop length
July 22, 2011 at 10:57 am #4370MemberAnd Of Course (to Add to my Previous Post); to Set Up Other Cue Points; say at the First Break; at the Second Break; where the Vocals Begin; Wherever; you just Duplicate the Track and Add your Different Cue Points so you can Start The Track at Different Parts; (You can Add As Many Cue Points and have As Many Duplicates As You Wish :));
U31, post: 4357 wrote: Im starting to get the hang now, a few difficulties in warping very complex tracks, and id like to be able to master loops and triggering them on the fly.. tho i have worked out how to type in the position of the beatmarkers and loop length
Hello my Friend 🙂
(In the Sample Box – to the Left Of the Waveform shown above in my Screenshot); Underneath the BPM there is Another Drop Down Box that by Default is Set To ‘Beats’; if you have a Complex Track; Click the Drop Down Box and Choose ‘Complex Pro’; this will Help You when Warping Full Tracks; Acapellas; Tracks Before the ’80’s; and Tracks with Musicians Rather than Electronic Music;
In my Screenshot Below you will see that I have Set My Loop Brace (the Bar in Black) 4 Bars from my First Warp Marker; (I have also Set My Warping Screen to ‘Narrowest Grid’ by Right Clicking in the Area Of The Waveform);
The Next Step is to Make Sure that the ‘End Of The Loop Brace Is On A Beat’; so we Zoom in to check;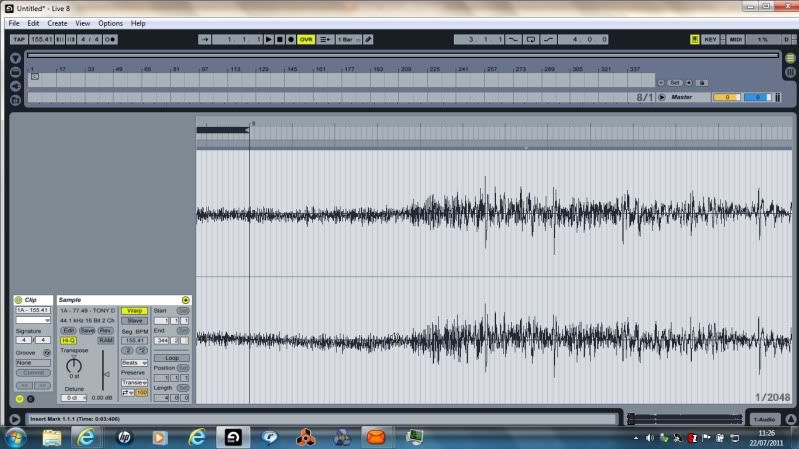
The End Of The Loop Brace is Not In Fact Landing On A Beat; So We Need To Make Sure It Does;
So; First Of All I Will Put a Warp Marker On The Largest Beat (Snare Probably); and then Shift This Warp Marker To The Closest Denomination Of A Bar I Can See; (This Beat Must Land On A Denomination Of A Bar);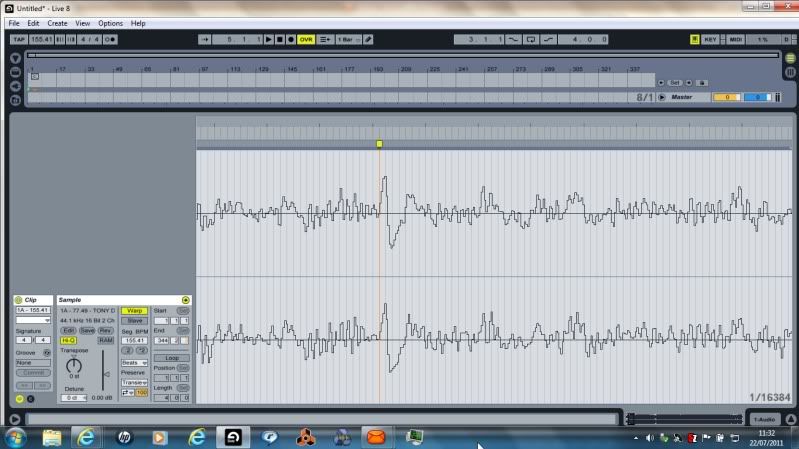
I have now Shifted this Warp Marker One Step To The Left; (this is Done Just By Clicking On The Warp Marker And Dragging Left);
Our Next Step is to Make Our Loop Brace 8 Bars Long; So Do This; and then Place The Beginning Of The Loop Brace On The Warp Marker We Made (After 4 Bars);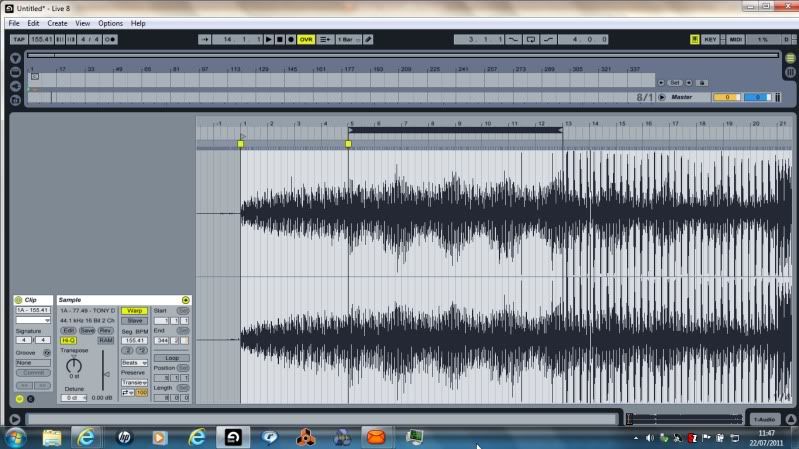
Now You Do Exactly What You Do When You Placed Your First Warp Marker After The 4 Bars; Placing A Further Warp Marker; and Adjusting If Necessary;
To Help You Move Your Loop Brace Through The Track More Quickly After This; (Whilst It Is Black – Which You Do Just By Clicking It); You Press Your ‘Up Arrow Key’ and the Loop Brace Will Move Forward 8 Bars 🙂What I Normally Do is Place One Warp Marker After 4 Bars; Then Move Forward 8 Bars and Place Another; Then One More 8 Bars Further In; Then One At 16 Bars After That; Then 16 Bars After That; Then every 32 Bars Following 🙂
If You Find a Track That ‘Drifts Badly’; at that Point (until you Get Past ‘The Drift’) I Go Back to 4 Bars At A TimeJuly 22, 2011 at 11:26 am #4372MemberCheers Emma for taking time out to help, that clears things up nicely!
July 22, 2011 at 11:45 am #1001151ParticipantEmma Partnow, post: 4363 wrote:
Now You Do Exactly What You Do When You Placed Your First Warp Marker After The 4 Bars; Placing A Further Warp Marker; and Adjusting If Necessary;
To Help You Move Your Loop Brace Through The Track More Quickly After This; (Whilst It Is Black – Which You Do Just By Clicking It); You Press Your ‘Up Arrow Key’ and the Loop Brace Will Move Forward 8 Bars 🙂What I Normally Do is Place One Warp Marker After 4 Bars; Then Move Forward 8 Bars and Place Another; Then One More 8 Bars Further In; Then One At 16 Bars After That; Then 16 Bars After That; Then every 32 Bars Following 🙂
If You Find a Track That ‘Drifts Badly’; at that Point (until you Get Past ‘The Drift’) I Go Back to 4 Bars At A TimeThanks Emma, that is the simplest I’ve seen it explained with screenshots and writing 🙂
July 22, 2011 at 12:23 pm #4379MemberU31, post: 4357 wrote: Im starting to get the hang now, a few difficulties in warping very complex tracks, and id like to be able to master loops and triggering them on the fly.. tho i have worked out how to type in the position of the beatmarkers and loop length
For your Reply to ‘Triggering Loops On the Fly’; I will go into Session View;
First of all; A Loop Can Be Audio Of Any Length (or MIDI); I Cut Out Samples/Loops from Tracks Virtually Every Night;
And So Far I Have Managed to Get Down to Cutting Out 64th Notes ! (Single Snare Hits/Hi-Hats);
Anyway; if you Struggle in Arrangement View with Cutting Out Samples; this Can Also Be Done in Session View;
In the Screenshot Below I have a 4 Bar Dubstep Loop (the Loop Can Be Any Size);
And I Have Put Warp Markers On Every Kick; Snare; Open H-Hat; Closed Hi-Hat; And Also A Double Speed Hi-Hat (where I have Pressed +2 on the BPM – Underneath The BPM Counter in the Sample Box – Which Is a Cool Effect;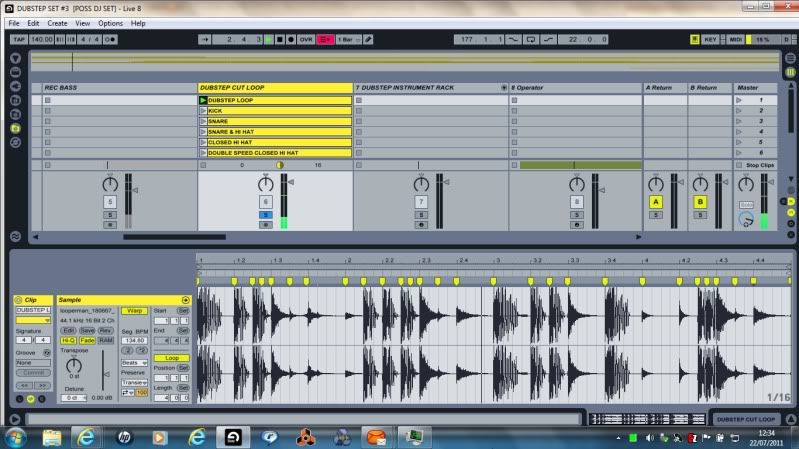
You Will Also Notice that in my ‘Channel’ Named ‘Dubstep Cut Loop’ I have 6 ‘Clips;
The First Clip is the Whole Loop;
The Second Clip is a Duplicate Of the First Loop; But With Just The Kick Drum Looping; This Is Done By Making Your Loop Brace In The Waveform Screen ‘Shorter’ So That ‘All You Hear’ Is The Kick Drum Looping;
This Is Shown in The Following Screenshot; Notice That The Loop Brace Is Just Looping On The Kick Drum; and the Rest Of The Loop Is ‘Greyed Out’; Meaning ‘Not Active’;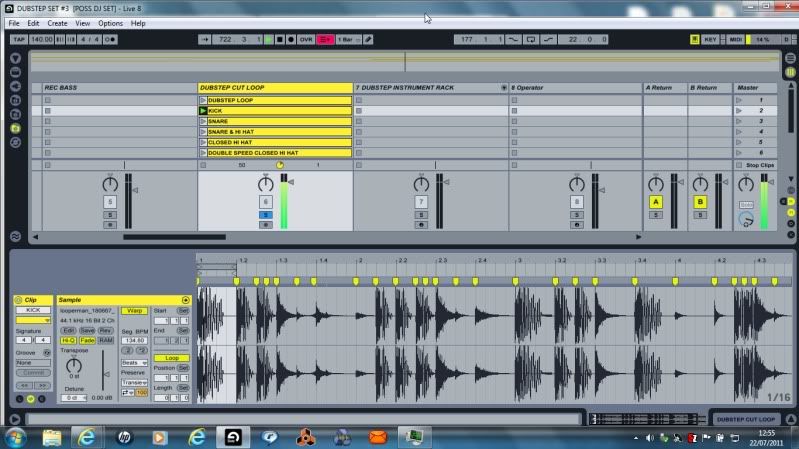
The Next Screen Will Show You The Snare Looping On Its Own; (3rd Clip Down); and in Order To Be Able To Work On This Clip So That I Could Loop The Snare; Again I Have Duplicated The First Clip (the 4 Bar Loop);
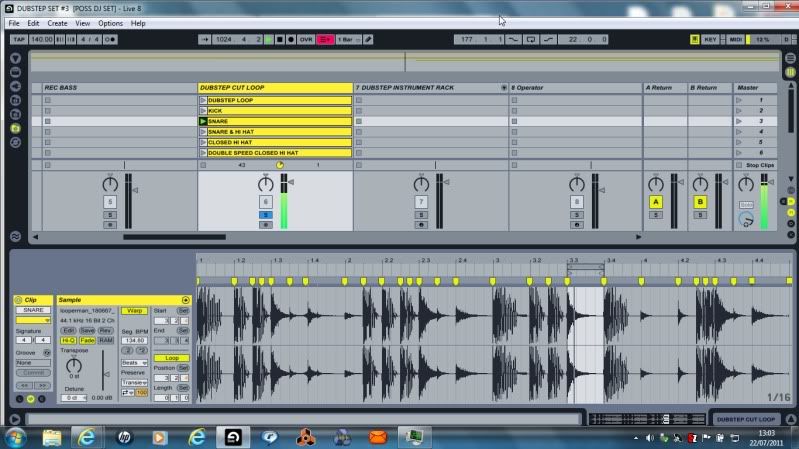
And Finally I will Explain How this Is Of Benefit To You 🙂
You Said that You Would Like To Be Able To Trigger Loops ‘On The Fly’;
If Say For Instance You Had Part Of An Acapella; or a Rolling Bassline; or a 4 X 4 Kick Drum (Literally Anything that Will Loop Without Any Clipping Or Popping at the End – this is Achieved By Just Making Slight Adjustments);
You Can Do Exactly What I Have Shown In These Screenshots;
The Important Thing Is To Have The Whole Track As Clip 1 (in my Case Just a 4 Bar Loop); and You Duplicate This Track (Or Loop) As Many Times As You Wish; Then; Within The Waveform Of The Track; Set Your Warp Markers Around The Section that You Wish To Use As A Loop; (And You Can Literally Have 100’s If You Wish);
Then; To Fire Them Off ‘On The Fly’; All You Do Is Press Whichever Clip You Wish; And In Any Order You Wish;
So In My Above Example I Can Make A Drum Loop That Is Completely My Own Just By Firing Off The Clips In The Order I Choose;
There Is A More Complicated Way Of Doing This Also; which Again I Would be Happy To Explain;
But Check This Out For Now (And The Warping); And Let Me Know How You Get On 🙂 🙂 -
AuthorPosts
- The forum ‘DJing Software’ is closed to new topics and replies.